Got some files on your *NIX system that need a good deletin on a regular basis?. Well then crontab is going to be your friend. There are tons of articles that painstakingly explain the crontab format when you Google “scheduled job Linux”, but how to actually implement a scheduled job using crontab from start to finish can be difficult to find. So here it is. Creating a working cron job using crontab.At issue today is going to be a directory part of the bedework calendar system. This directory stores current event information in the form of an RSS file that is generated upon an initial HTTP request. Subsequent HTTP requests, however, will continue to download the original RSS file even if it is no longer up-to-date because new events have since been added. A cron job is required to delete this RSS file on a regular basis so that when an initial request for it comes a long, an up-to-date copy of the RSS file will be generated. This way there is little chance for an HTTP request to retrieve an outdated or “cached” version of the RSS file.
The information we have:
- The path to the file(s) we want to delete (in my case they’re rss files).
/usr/local/calendar/apache-tomcat-5.5.17/webapps/webcache/v1.0/rssDays
- The command we want to execute on those files (remove/delete).
find /usr/local/calendar/apache-tomcat-5.5.17/webapps/webcache/v1.0/rssDays -type f -exec rm {} ; - The frequency with which we want this task to recur.
every 5 minutes.
- Start Time
1:00 AM
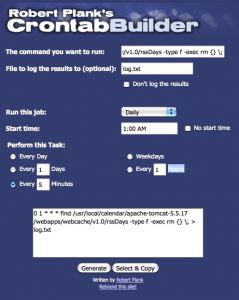
[step 1] Visit Robert Plank’s Crontab Builder and fill out the requested fields. Now click Generate and then Select & Copy to copy the text to your clipboard.
[step 2] Your clipboard will now contain a line similar to what is shown below. We can create a cron file with this text or we can modify our cron jobs using the crontab -e command.
0 1 * * * find /usr/local/calendar/apache-tomcat-5.5.17/webapps/webcache/v1.0/rssDays -type f -exec rm {} ; > log.txt
[step 3] In a console window, sudo to root (type sudo su and enter your root password) or type:
sudo crontab -e
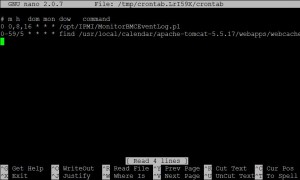
[step 3] This will bring up the cron job editor where you can just paste the text from your clipboard on the next open line. Now type CTRL + x to exit and be sure to save the changes when prompted by typing Y for Yes.
[step 4] To verify that your cron job has been added, you can use the crontab -l command to list all available cron jobs in the system.
crontab -l
This should return a list which now contains the line you added in step 2.
That’s it.

