A while ago I wrote an article on how to “gmailify” your Hotmail. In this article I’ll will show you how to “gmailify” your Yahoo! mail. Not clear on what “gmailify” even means? Well, to [jee-meyl -ih-fahy] (I totally made it up) means to apply all functionality of the Gmail interface to something other than Gmail (in this case Yahoo! Mail). Why? Because Gmail has better spam filters, a faster more responsive interface, message threading…the list goes on. Yes it’s obvious I love Gmail, but I understand if you don’t, so this article will also show you how to enable POP3 access on your Yahoo! Mail Classic account (which is normally only reserved for Yahoo! Mail Plus customers).
So these are the instructions on how to enable POP3 access on a free or Classic Yahoo! Mail account (UPDATED 6/2010):
[step 1] Log into your Yahoo! Mail account.
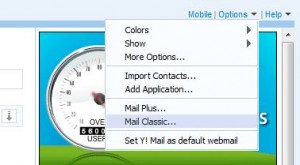
[step 2] To the right of your screen locate the Options link and switch to Mail Classic….
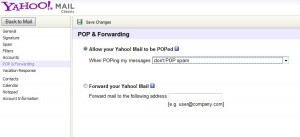
Then click Options -> Mail Options. Notice that when you click on POP & Forwarding your only options are to upgrade to Yahoo! Mail Plus (Dang). For US Yahoo! Mail customers, POP3 access has been enabled by default. The screen shot below is from 11/2009 at which time POP3 access was limited to Yahoo! Mail Plus accounts.
[step 3] Verify that under POP & Forwarding you have your Yahoo! Mail POPed.
If your POP access is enabled, you can skip the rest of the Yahoo! instructions and skip ahead to the Gmail setup. Otherwise, I believe the next steps will still work.
[step 4] Click on Account Information and you’ll be redirected to a new page with your personal Yahoo! account preferences. On this page, under Account Settings, click Set language, site, time-zone.
[step 4] From the New Setting pull down choose Yahoo! Asia Yahoo! Ireland and click OK.
[step 5] Click I accept to continue.
[step 6] You’ll be re-directed to the Yahoo! Asia Ireland Mail login page, but your password will probably not work here so just close out that page. Go back to mail.yahoo.com and log in using your Yahoo! username and password.
[step 7] Once logged back into your Yahoo! Mail account, click Options->POP & Forwarding one more time. Notice this time you have the option to setup POP & Forwarding.
[step 8] Now select Web and POP access and if you’d like click on the View POP settings link to see how to setup your favorite POP3 client with Yahoo! Mail.
To check Yahoo! Mail from within Gmail and to use Gmail to send Yahoo! mail follow these steps:
[step 1] Log into your Gmail account.
[step 2] Click Settings->Accounts and Import and then click the Add POP3 email account button.
[step 3] Enter your Yahoo! email address and Gmail should complete the other necessary information automatically. If not copy it from the information you obtained in [step 8].
[step 4] Click Add Account > to continue. If you want to send Yahoo! Mail from Gmail, you’ll need to verify your email. This is done by sending an email to your Yahoo! account with a verification link you can click to complete the process.
[step 5] Specify whether or not you want to use the Gmail SMTP servers to send mail or the Yahoo! servers (I recommend Gmail servers).
[step 6] Verify your email by logging into your Yahoo! mail account and clicking the link in the Google verification email.
That’s it. Now you’re Yahoo! Mail will show up in Gmail and you’ll be able to enjoy all the features and reliability of Gmail while keeping your Yahoo! email address. One thing that I should note is that Gmail will only check your Yahoo! account every 15 minutes and there’s no way to increase that. You can, however, check the account manually by clicking on Settings->Accounts and Import.


Comments
8 responses to “GMailify your Yahoo! mail”
[…] POP3 email account. For instructions on how to do this checkout my Gmailify your Hotmail or your Yahoo! Mail […]
http://www.google.com
Hi,
I have been trying this, but have continually got stuck once changing my Yahoo Location to Yahoo Asia! Once changing my settings, the POP and forwarding option does NOT appear. Help please!
@Hannah
Sorry to hear it doesn’t work anymore. Perhaps Yahoo stopped giving away POP access on the Yahoo Asia! accounts. I just switched my account settings to Yahoo UK & Ireland (in [step 4]) and that still works, so I would give that a try.
Hope that helps,
David
Hi,
I have been trying this, but have continually got stuck once changing my Yahoo Location to Yahoo Asia! Once changing my settings, the POP and forwarding option does NOT appear. Help please!
Hi Ayush,
Switching to Yahoo Asia from a US English account is no longer required for downloading POP mail from a yahoo account. I’m sorry, but Yahoo has changed this since I published this article and I haven’t gotten around to updating it (will do tonight). Right now on US Yahoo accounts in POP & Forwarding options, you should be able to select the “Allow your Yahoo! mail to be POPed”. This is all you need to complete all yahoo steps in the process. If you see this option and have checked it, simply continue to the gmail setup section and you should be good.
I’ll fix the article with screenshots of the new Yahoo! Mail interface tonight.
What a great web log. I spend hours on the net reading blogs, about tons of various subjects. I have to first of all give praise to whoever created your theme and second of all to you for writing what i can only describe as an fabulous post. I honestly consider there is a skill to writing articles that only a few posses and honestly you have it. The combination of informative and quality content is definitely extremely rare with the massive amount of blogs on the net.
[…] GMailify your Yahoo! mail | David Vielmetter […]