I’ve always wanted to create my own time-lapse movie, but never had the money to invest into the equipment. With the CHDK firmware add-on for Canon’s Digic II, Digic III and Digic IV cameras it is now possible for anyone with a Canon camera to do it. The CHDK firmware add-on has been around for a while, but only recently supported my Canon SD600 Digital Elph point & shoot camera. Ever since I’ve been trying to find the time and conditions to shot one. Germany’s cloudy summer weather was perfect.To make my movie here’s what I did:
- Checked to see if my camera was supported by the CHDK firmware update here and download the firmware for it (I downloaded the Powershot SD 600 1.00D version).
- Unzip the software onto your SD card (I’d back up any existing pictures just in case).
- Download and save this file into the CHDK/SCRIPTS directory of your SD card.
- Adjust the picture quality settings so that you can at least 300 pictures.
- Turn your camera off, switch to picture viewing mode, and turn it back on.
- Press menu and scroll down to firmware update where it says update firmware to 1.0.0.0 to 1.0.1.1 and click OK (don’t worry you are not permanently altering your cameras firmware. To go back to your camera’s standard firmware, just turn it off and on again).
- Now you’ve installed CHDK and can use it’s features by pressing the printer button on your camera. Once you press that button your cameras standard menu’s will disappear and be replaced by CHDK’s menu’s. No your function button will bring up a folder menu where you can load a script. Load the timelapse.bas script.
- The script has a few parameters you can change to your liking (the frequency of the shots, how many total, the initial delay, etc). I adjusted my delay to 2, the frequency to 10 and the total to 300 keeping battery life in mind.
- Pressing the shutter button will execute the script and your camera will continue taking pictures until you hit the shutter button again to interrupt the script. Just pick a location and let her rip.
- Simply drag the pictures into Windows Live Movie Maker.
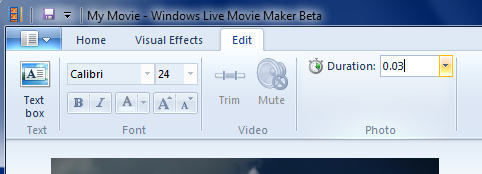
- Select all of the pictures and click the Edit tab. With all pictures selected enter the shortest duration (0.03 seconds) into the duration window manually with your keyboard.

- You can preview your movie but mine didn’t preview correctly in some sections (probably a bug in WLMM). Either way it doesn’t matter if you export the movie now it’ll work fine once it is in WMV format.
Here is the movie I made in a few minutes (well, plus the 1.5 hours of letting the camera acquire the pictures):
Comments
4 responses to “Timelapse photography the easy way”
This is great! Now I have to figure out how to do it to capture a full day. My goal is to determine the shading patterns of a remote site. Any thoughts?
Your main issue will be the battery life if you want to capture 1 whole day, especially if you’re taking shots every few seconds. I turned my screen display off during shooting and that helped some, but a whole day of shooting might be hard unless you have the ability to connect an external power supply. To turn the screen off you’ll need to exit alt (or chdk) mode by pressing the print button on your camera, then hit the display button until your display turns off and then the alt button again to re-enter chdk mode. Now when you press the shutter it should execute your script w.out the display to save some juice.
Hey thanks for the info. But where do I put the text file at? When I click on your link it brings up text but not a file. Do I have to insert the text somewhere? Thanks again. Great site.
jerod,
Thanks for letting me know. I fixed the link and you should be able to download the BAS file now.
David