[the problem]
How to silently deploy Microsoft Office 2016, uninstall previous versions of MS Office, migrate existing MAPI profiles, and remove old shortcuts & replace them with new ones. NOTE: This article is for deploying Microsoft Office 2016 Standard or Professional with a perpetual volume license or MAK key. To deploy Office 365 applications, I’d recommend the Office 2016 Deployment Tool and/or the Click-To-Run Configuration Tool.
[the solution]
Batch script + Office Customization Tool (OCT)
- Download the Office installation ISO file from your volume license portal and note down the Multiple Activation Key (MAK).
- Unzip the ISO file using 7zip or your preferred unarchiver to a shared folder (i.e. \\SERVER\SHARE\OFFICE.16).
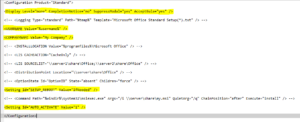
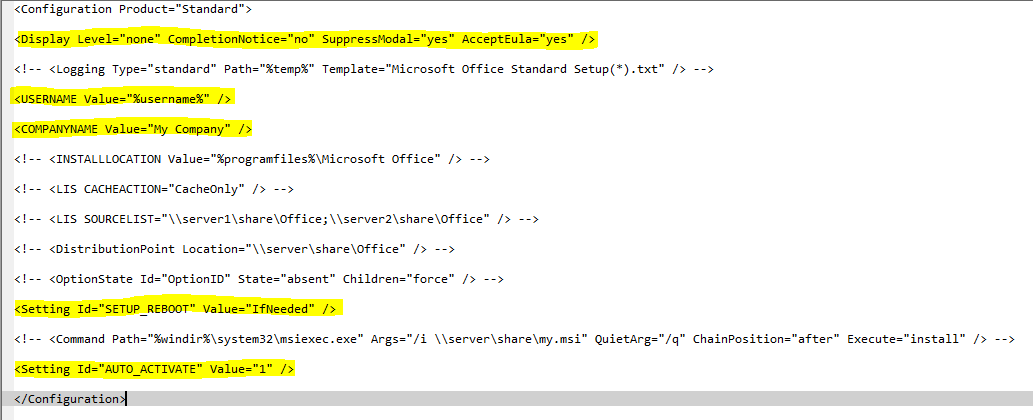
- Modify the config.xml file in \\SERVER\SHARE\OFFICE.16\<standard>.ww\config.xml by uncommenting and filling in the following lines. NOTE: the folder <standard> may vary based on the version of Office 2016 you have licensed (i.e. pro.ww for professional).
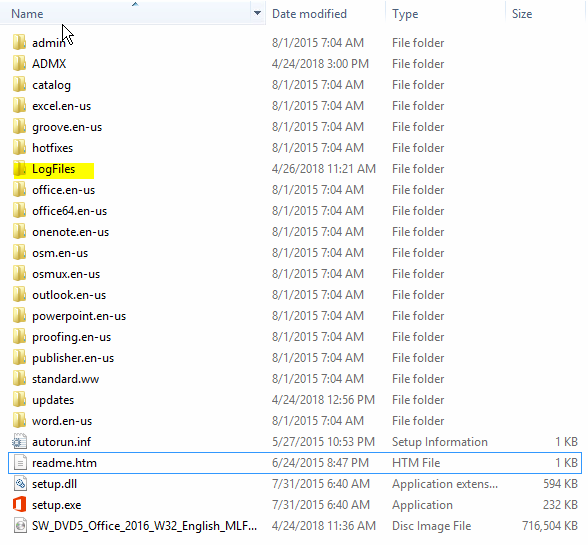
- Create a folder named logfiles in \\SERVER\SHARE\OFFICE.16

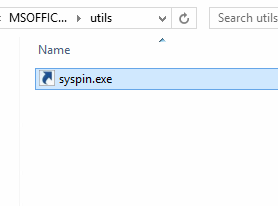
- Create a folder named utils in \\SERVER\SHARE\OFFICE.16. Download syspin.exe (check it for viruses after download) and copy it to the utils folder you created.
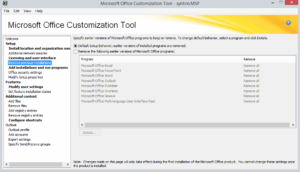
- Run (WIN+R) \\SERVER\SHARE\OFFICE.16\setup.exe /admin to launch the Office Customization Tool (OCT).
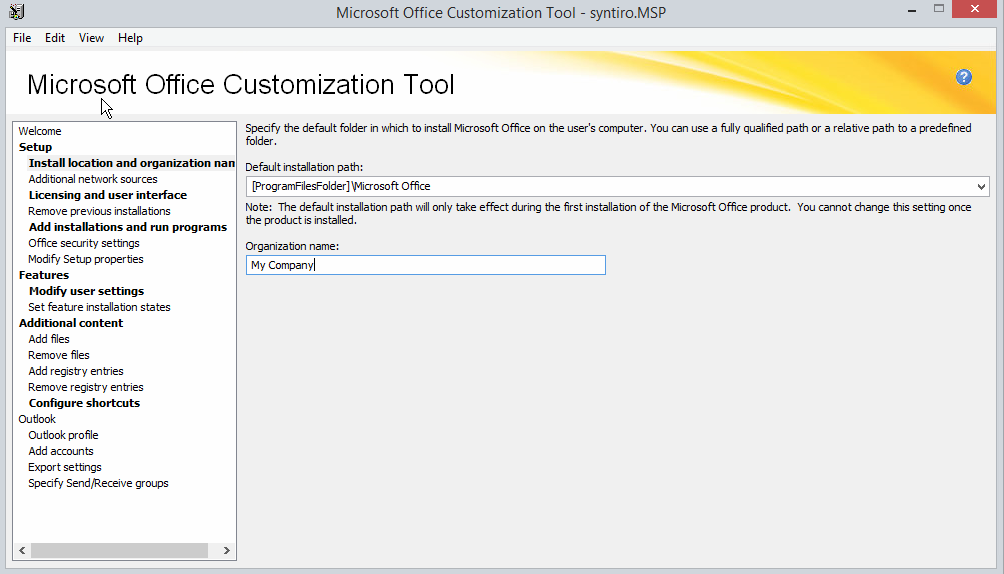
- Click Install location and organization name and modify the details to match your company details. NOTE: This setting will apply to all installations (author information).

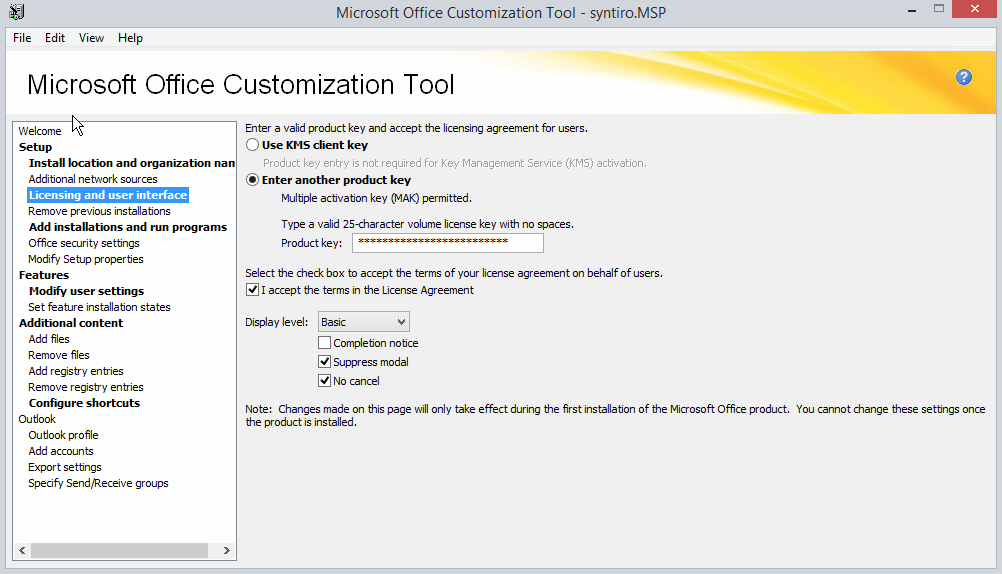
- Click Licensing and user interface and add your MAK key and check the options for Suppress modal and No cancel.

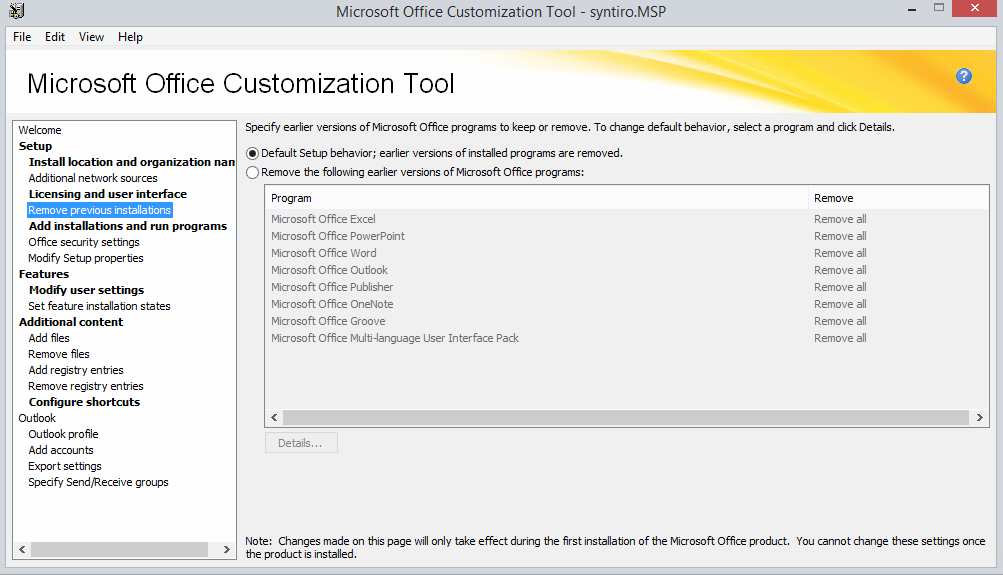
- By default the installer will remove older versions of MS Office prior to the installation. If that’s desired, leave the default option selected under Remove previous installations (recommended).
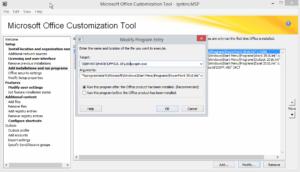
- If you’d like to pin Office application shortcuts to the task bar, click Add installations and run programs. Click Add… and enter the following for each Office program you’d like to pin enter the following:
Target: \\SERVER\SHARE\OFFICE.16\utils\syspin.exe
Arguments: “%programdata%\Microsoft\Windows\Start Menu\Programs\PowerPoint 2016.lnk” c:5386
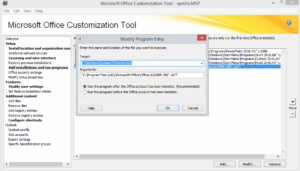
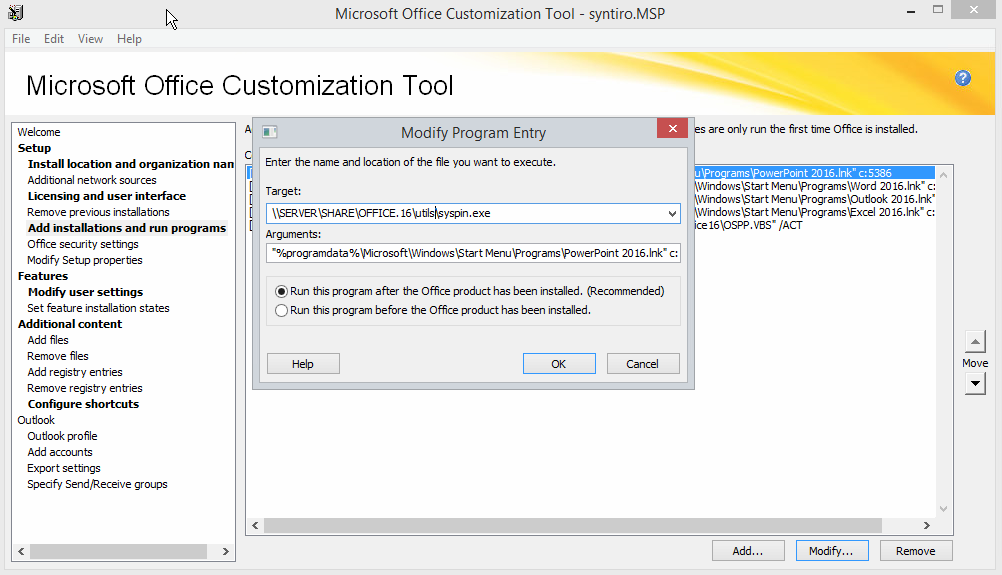
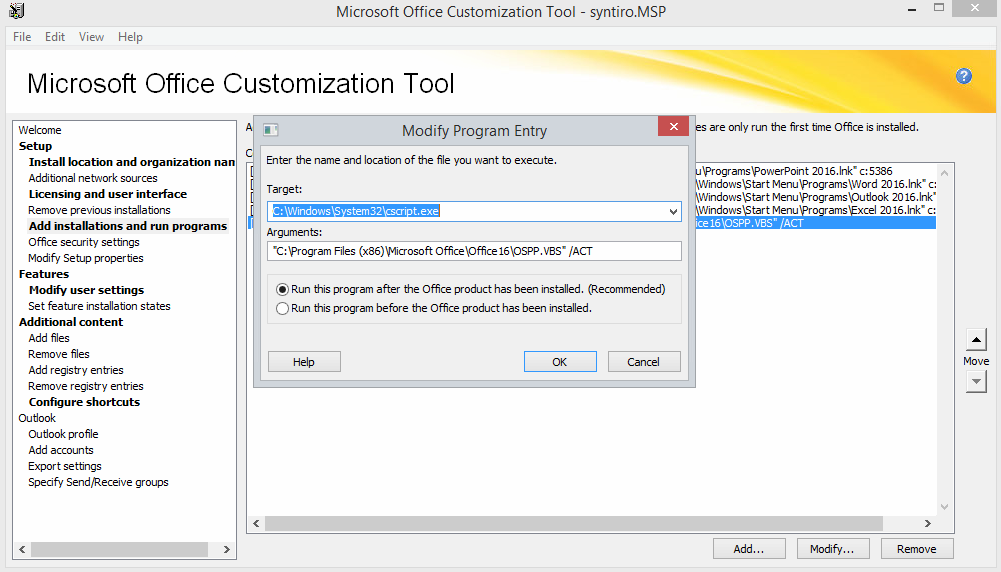
- If you’d like to automatically activate Office upon completion of the installation, click Add… and enter the following. NOTE: the config.xml option to auto_activate does not work for MS Office 2016:
Target: C:\Windows\System32\cscript.exe
Arguments: “C:\Program Files (x86)\Microsoft Office\Office16\OSPP.VBS” /ACT
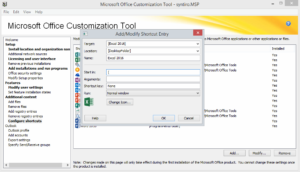
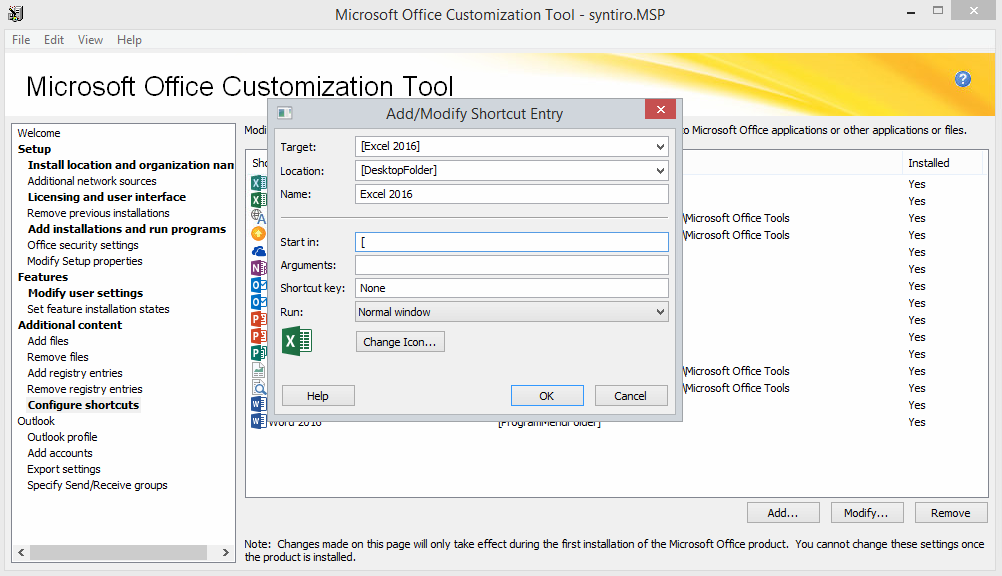
- If you’d like to automatically create shortcuts on the desktop or other locations click Configure shortcuts and then Add…. NOTE: The Office 2016 OCT tool has a bug where adding shortcuts with an empty Start in: location generates an error. To get around this, simply place an opening bracket [ into the Start in: field.
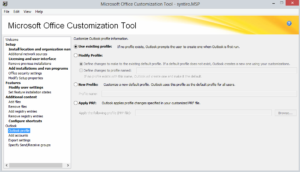
- Specify your desired MAPI profile behavior under Outlook Profile.
- Save the resultant <customname>.MST file into \\SERVER\SHARE\OFFICE.16\updates.
- Create a batch file with the following contents and store it in \\SERVER\SHARE\OFFICE.16\utils\deploy.office.16.bat

—————–start batch file——————-
setlocal
REM ********************************************************************
REM Environment customization begins here. Modify variables below.
REM ********************************************************************
REM Get ProductName from the Office product’s core Setup.xml file, and then add “office15.” as a prefix.
set ProductName=Office16.STANDARD
REM Set DeployServer to a network-accessible location containing the Office source files.
set DeployServer=\\SERVER\SHARE\OFFICE.16
REM Set ConfigFile to the configuration file to be used for deployment (required)
set ConfigFile=\\SERVER\SHARE\OFFICE.16\standard.ww\config.xml
REM Set LogLocation to a central directory to collect log files.
set LogLocation=\\SERVER\SHARE\OFFICE.16\logfiles
REM ********************************************************************
REM Deployment code begins here. Do not modify anything below this line.
REM ********************************************************************
IF NOT “%ProgramFiles(x86)%”==”” (goto ARP64) else (goto ARP86)
REM Operating system is X64. Check for 32 bit Office in emulated Wow6432 uninstall key
:ARP64
reg query HKEY_LOCAL_MACHINE\SOFTWARE\WOW6432NODE\Microsoft\Windows\CurrentVersion\Uninstall%ProductName%
if NOT %errorlevel%==1 (goto End)
REM Check for 32 and 64 bit versions of Office 2013 in regular uninstall key.(Office 64bit would also appear here on a 64bit OS)
:ARP86
reg query HKEY_LOCAL_MACHINE\SOFTWARE\Microsoft\Windows\CurrentVersion\Uninstall%ProductName%
if %errorlevel%==1 (goto DeployOffice) else (goto End)
REM If 1 returned, the product was not found. Run setup here.
:DeployOffice
echo %date% %time% %ComputerName% “Has Run the install Process” >> %LogLocation%\HasRunInstall.txt
start /wait %DeployServer%\setup.exe /config %ConfigFile%
echo %date% %time% %computername% Setup ended with error code %errorlevel%. >> %LogLocation%\FinishedInstall.txt
REM If 0 or other was returned, the product was found or another error occurred. Do nothing.
:End
Endlocal
—————–end batch file——————-
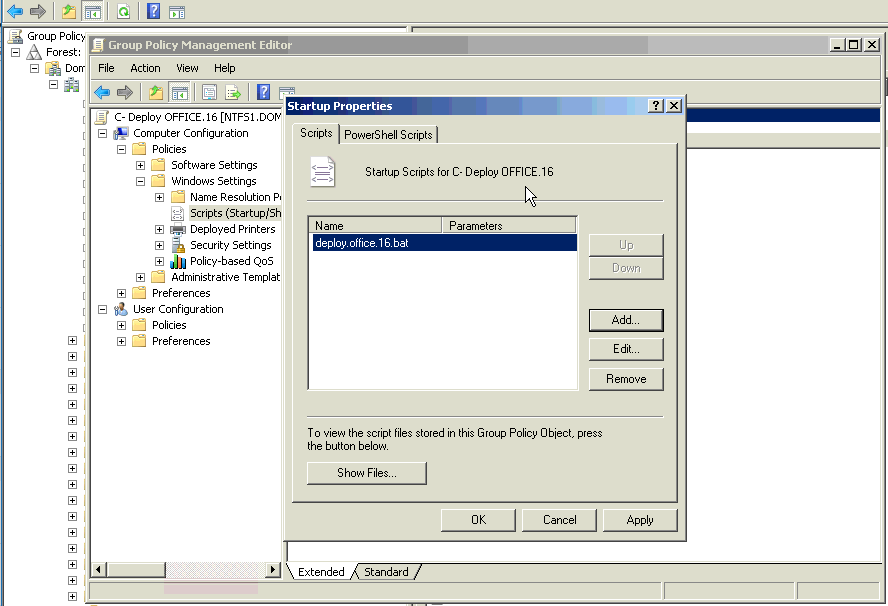
Create GPO:
- Create a GPO for deploying MS Office.
- Expand Computer Configuration->Policies->Windows Settings->Scripts->Startup and point to that batch file created in step 15 above.
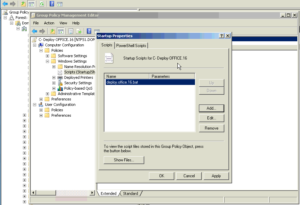
- Link the GPO on an OU containing workstations.
- Reboot workstations remotely and check your logfiles folder for installation status.