It can be a tedious task to bulk wipe systems to DoD 5220.22-M standards. Especially if you need to keep track of what you’ve wiped and when. There are a handful of tools available for free which allow you to essentially boot and wipe systems and there are many vendors selling appliances to bulk wipe many hard drives simultaneously.
[the problem]
Booting systems off a USB thumb drive, then running Killdisk, specifying details for a wipe certificate, selecting the main hard drive and wiping it to DoD 5220.22-M specifications requires about 5-7 minutes of work per workstation. The process yields a system with a verified wiped hard disk and a PDF certificate with the company logo, technician’s name and the hard drive serial number.
[the solution]
Batch scripting.
Certain versions of Active Killdisk can be run in batch mode and can read commands passed as parameters. This allowed me perform several of the time consuming technician tasks mentioned above via command line. There’s an article about automating erasures which covers some of the tasks I was interested in here.
Active Killdisk uses an INI file for application specific settings, so the first task was to configure the software as the technicians typically do during the wipe process. This included adding a logo image file for the certificate and some information about the technician and company. I simply ran Active Killdisk and set the program settings as I wanted them, then located the resultant INI file in C:\Program Files (x86)\LSoft Technologies\Active@ KillDisk <version>\. This is the resultant INI file from which one line has been removed (logComments=) as another script will add that line back in later.
————killdisk.ini start————-
[General]
initHD=true
initRD=true
initCD=false
initFD=false
excludeSystemDisk=false
autoEject=false
mapName=
mapPath=
mapUser=
mapPass=
logging=0
eraseInHex=false
wipeInHex=false
showCert=true
saveCert=true
initDevice=true
fingerPrint=false
clearLog=false
ignoreErrors=true
skipConfirmation=false
retryAtt=2
accessDeniedCount=0
certPath=X:\\
logPath=X:\\
logName=killdisk.log
attachCert=false
wipeMethod=2
wipeVerification=true
wipeVerificationPercent=10
wipeUserPattern=Erased by Active@ KillDisk
wipeUserPasses=3
wipeUnusedCluster=true
wipeUnusedBlocks=false
wipeFileSlackSpace=false
killMethod=2
killVerification=true
killVerificationPercent=10
killUserPattern=Erased by Active@ KillDisk
killUserPasses=3
hideDefaultLogo=false
showLogo=true
logoFile=X:/logo.png
shutDown=false
writeLogXML=false
saveToRemovable=false
sendSMTP=false
toSMTP=
useDefaultAccount=true
authorizeSMTP=false
fromSMTP=
nameSMTP=
usernameSMTP=
passwordSMTP=
portSMTP=2525
clientName=Client Name
technicianName=Tech Name
companyName=Company Name
companyAddress=”123 Street St, City, ST 10001″
companyPhone=4051235555
defaultSerialDetectionMethod=2
deviceSerial=
[Geometry]
showProp=1
showPrev=0
s1=200
s2=200
spl=”658,0″
spl2=”467,117″
spl3=”0,389,195″
spl4=”357,658″
pos=@Point(-8 -8)
size=@Size(1024 681)
aContanerSize=@Size(666 80)
palette=0
————killdisk.ini end————–
Next we’ll have to create a batch file that can run in Windows PE and copy our logo and INI to locations where Killdisk will be looking for them, run Killdisk, and then copy some generated certificates back to the thumb drive upon completion.
————kd-script.cmd start———
@ECHO OFF
::Filename: KD-SCRIPT.CMD
::———————————————————————————-
::Find the volume or drive letter of the bootable media that KillDisk is running from.
::This will search for the KILLDISK.INI file on all volumes and then copy the file to the root of the WinPE boot partition.
::This needs to be done because this is where killdisk.exe will look for the INI file to load settings from when started.
FOR %%i IN (c d e f g h i j k l m n o p q r s t u v w x y z) DO IF EXIST %%i:\User_Files\KILLDISK.INI (
SET DrvLtr=%%i
GOTO END )
:END
COPY %DrvLtr%:\User_Files\KILLDISK.INI X:\KILLDISK.INI
::———————————————————————————-
::Get the Service Tag/Asset number of the system.
::Run WMI command querying the system for the computer systems serial number or service tag.
::The resultant value is then inserted directly into the KILLDISK.INI settings file already on the X:\ root partition.
::Once erasure is complete, the resultant PDF certificate will contain the system serial number or service tag of the computer.
For /f “skip=2 tokens=2 delims=,” %%i in (‘wmic bios get serialnumber /FORMAT:csv’) do (set “servicetag=%%i”)
ECHO logComments=”Computer Serial Number: %servicetag%”>>X:\KILLDISK.INI
::———————————————————————————-
::Command line parameter to launch KillDisk and complete erasure of the primary hard drive.
::The command -ip=”X:\\” tells killdisk where to look for the INI file to load settings from.
::The command -cp=”X:\\” tells killdisk where to store the resultant certificate file.
::The command -eh=80h will attempt to locate the first physical disk of the system and select it for wiping.
::The command -em=2 tells killdisk to wipe to DoD 5022.22 specification.
::For a list of all KillDisk command line options, please visit this page.
::http://www.killdisk.com/commandline_win.htm
KILLDISK -ip=”X:\\” -сp=”X:\\” -eh=80h -em=2 -nc -bm
::———————————————————————————-
::To append the Service Tag number into the KILLDISK.LOG file (including date/time stamp),
::you may use the following example.
::This can only be added to the LOG file after KillDisk has finished erasing the hard drive.
ECHO %date:~6,4%-%date:~0,2%-%date:~3,2% %time:~0,8% ServiceTag#: %servicetag% >> X:\KILLDISK.LOG
::———————————————————————————-
::You may use a copy command to copy the KillDisk Certificate file and the LOG file
::from the X:\ back to the attached USB Flash memory stick.
COPY X:\*.PDF %DrvLtr%:\
COPY X:\*.LOG %DrvLtr%:\
::———————————————————————————-
:EOF
———kd-script.cmd end————
So, now you’ll have 3 files:
logo.png
kd-script.cmd
killdisk.ini
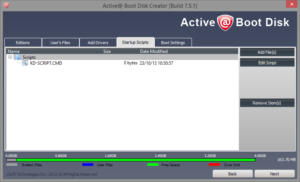
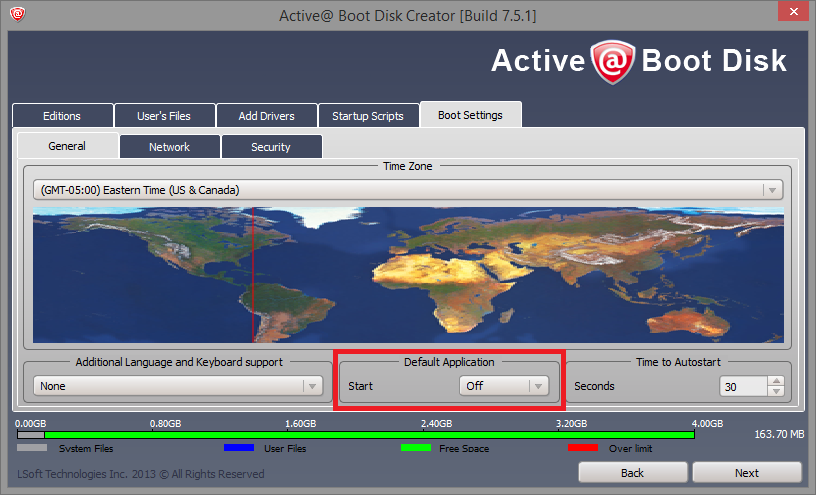
Create your thumb drive using the creator application that comes with killdisk. During that process make sure of the following:
- Set the startup of Killdisk to Off or None.

- Add the killdisk.ini and logo.png files to user files.
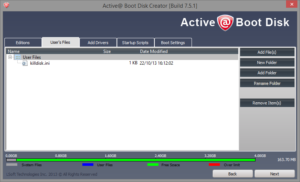
- Add the kd-script.cmd file to startup files.


Generate your bootable media.
Here’s what should automatically happen automatically when a system is booted off this media (USE CAUTION WHEN TESTING – TARGET SYSTEM HARD DRIVES WILL BE WIPED!!!):
- WinPE should boot and automatically launch killdisk.exe.
- Killdisk.exe should automatically load settings from the INI file we supplied.
- Killdisk.exe should automatically find the local hard drive and begin wiping it to DoD5022.22 specs.
- Upon completion two files will be copied back to the thumbdrive. A custom PDF wipe certificate and a killdisk.log file.
That’s it.