I have a couple of customers in the restaurant business. In fast food, being able to change your pricing/menu offerings quickly is apparently key, so lots of fast food places have digital signage that can be updated quickly. This solution is slightly more clunky than a corporate managed signage solution, but it works, is relatively cheap to implement and fairly straight forward to maintain. Here’s how it works:
[requirements]
- Intel NUC with two HDMI ports for two menu-boards (Intel NUC DC3217IYE – $260.00 at amazon.com)
- Some RAM memory (Samsung 4GB DDR3 SODIMM – $34.00 at amazon.com)
- A Small SSD (Kingston 32GB mSATA SSD – $39.00 at amazon.com)
- [Download] Irfanview (free)
- [Download] ImgBurn (free)
- [Download] Windows 7 USB download tool (free)
- [Download] Multi-monitor tool (free)
- Windows 7 64 Bit (builders edition of Windows 7 Home Premium – $85.00 at amazon.com)
- A wifi or 3g/4g adapter (optional)
- Mickey mouse power cord (needed for power supply – $4.00 at amazon.com)
- 4GB USB Flash Drive or usb-sata adapter and DVD drive.
- USB Mouse and Keyboard
- Some large menu images at 1920×1080 resolution.
- Remote control software like TeamViewer (recommended)
TOTAL COST (including Windows 7 license): $422
[assembling the NUC]
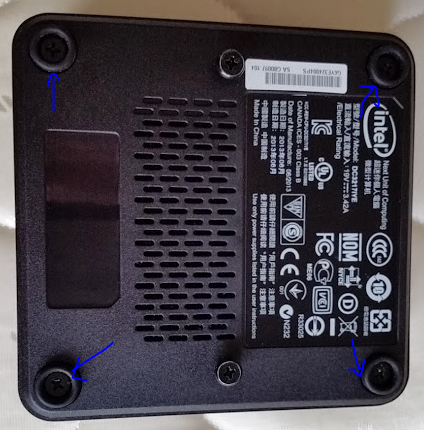
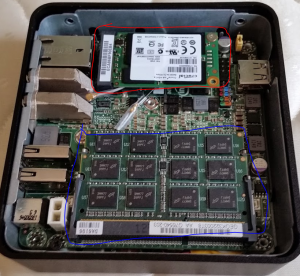
[step 1] Remove 4 screws from the bottom of your Intel NUC unit to open it up and install the RAM(blue) and SSD (red).
[step 2] Use another computer to make the 4GB USB flash drive into a bootable Windows 7 installation media device. If you have a DVD drive and a usb-sata adapter, connect that up to the Intel NUC, pop in the Windows 7 DVD and skip to [step 3].
- Download and install ImgBurn.
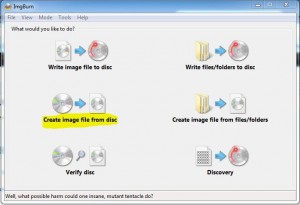
- Pop the Windows 7 DVD into the DVD drive and open ImgBurn.
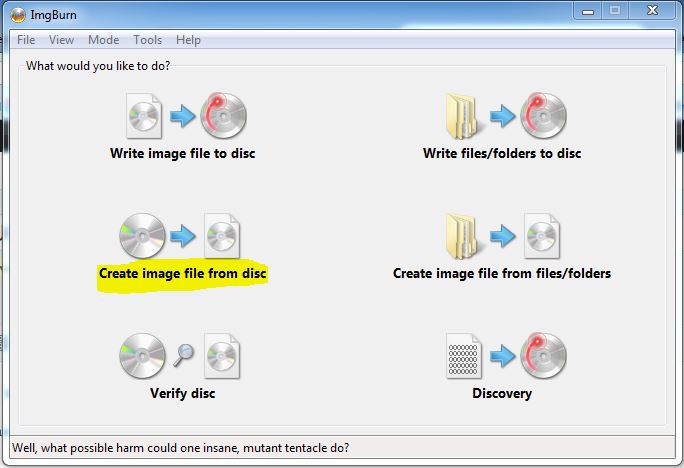
- Select Create image file from disc, indicate the desktop as the destination for a file named Windows7.iso and DVD drive as the source. Then click Start.
- Once complete, you should have a 3.2GB file named Windows7.iso on your desktop.
- Download and install the Windows 7 USB download tool.
- Plug in your 4GB USB flash drive and note the drive letter. If it asks you to format the flash drive, just do a quick format and note the drive letter (i.e. F:\)
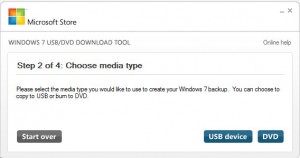
- Open the Windows 7 USB download tool, click browse and locate the Windows7.iso file you created then click Next.
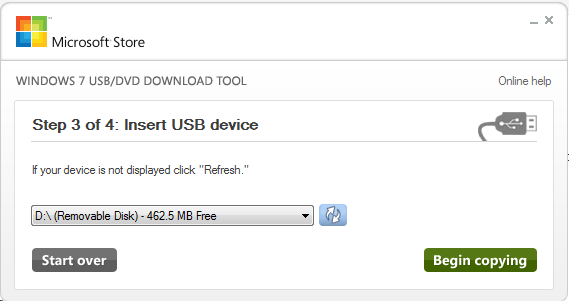
- Click USB Device then specify the Drive letter noted down earlier. NOTE: This process will completely erase what’s on the flash drive. Click Begin copying.


[step 4] Plug the usb-sata adatper with the DVD drive attached or the USB flash drive you created in [step3] and connect the Intel NUC to power, a monitor and keyboard and mouse, then power it on. The unit will attempt to boot off the USB device by default.
[step 5] Install Windows 7 and when complete supply the appropriate chipset, ethernet and video drivers for the Intel NUC after downloading them from the Intel website.
[step 6] Download and install Irfanview, then create a folder on the C:\ drive called Apps.
[step 7] Upload your menu image files in PNG or JPG format to the C:\apps folder. Name them something like monitor1.jpg and monitor2.jpg or something that makes logical sense to you.
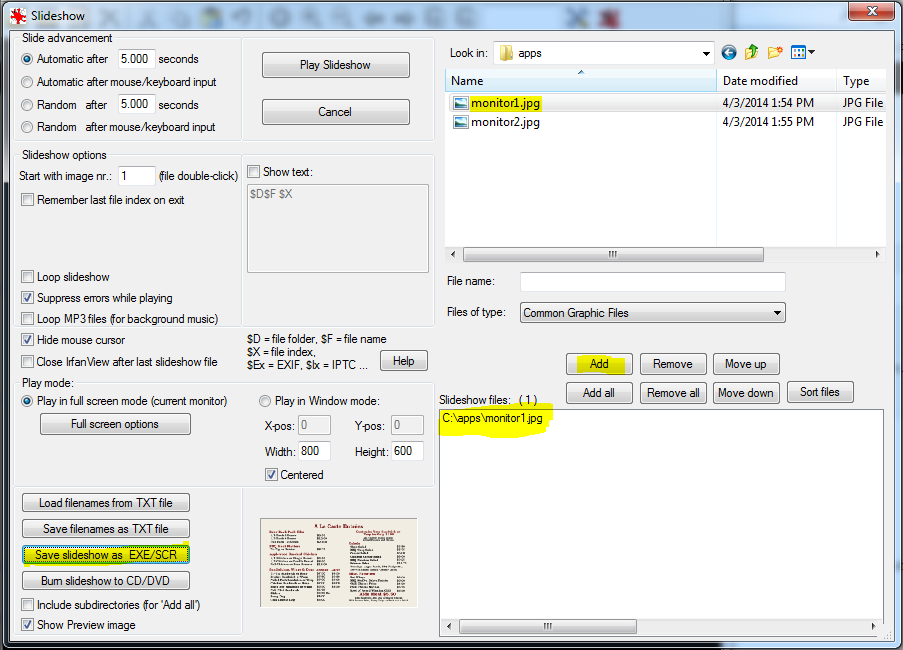
[step 8] Next we’re going to create two self executable slide show files that have just one picture in them. One with the menu image for monitor1 and another for the image for monitor two. To do this, open Irfanview and click File->Slideshow. Specify the settings shown in the screenshot (check boxes and radio button selections) and navigate to C:\apps using the Look in file browser. Then highlight one of the two image files you copied there and click the Add button. Next click the Save slideshow to EXE/SCR button.
NOTE: Adding all images here (instead of one image at a time) will create a single slideshow executable with multiple image files that cycle based on the settings in the Slide Advancement section.
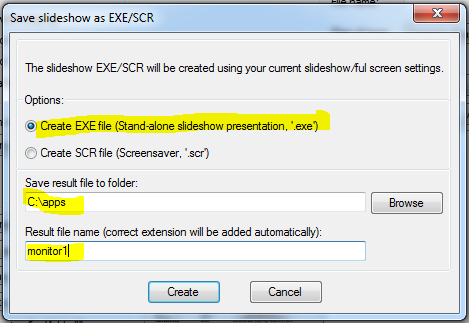
Select the options shown in the screenshot below and name your resultant file monitor1 (this will create a resultant monitor1.exe file in the C:\apps folder) and click Create. Repeat this step for the second monitor2.jpg file by removing all previous slideshow files in the slideshow dialog and adding the monitor2.jpg file then creating a monitor2.exe file.
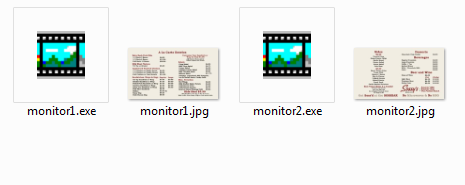
[step 9] The contents of your C:\apps directory should look like the screenshot below now. We can test launch each EXE to make sure it displays the menu full screen and hides everything else on the screen (i.e. taskbar, mouse cursor, etc). If it does not, go back to [step 8] and adjust your slideshow dialog options appropriately. NOTE: Click the mouse on each image one time and hit the escape key on your keyboard (Esc) to exit the slideshow view.
[step 10] Download and extract the MultiMonitor Tool from Nirsoft. Copy MultiMonitorTool.exe to C:\apps.
[step 11] Create a new text file in C:\Apps, open the file using Notepad and paste the following text into the file:
———-start copy below this line———
@echo off

taskkill /im monitor1.exe

taskkill /im monitor2.exe

start C:\apps\MultiMonitorTool.exe /enable 1 2

start C:\apps\monitor1.exe /monitor=1

start C:\apps\monitor2.exe /monitor=2

exit
——–end copy above this line———–
Save and close the text file and rename it to displaymenu.bat. NOTE: you may need to uncheck the Hide extensions for known file types in Windows Explorer->Organize->Folder and search to rename the file to a bat extension. The icon of the file should change as shown below if you’ve renamed the file properly. Double-click the displaymenu.bat file to test the bat file and make sure each menu displays on the correct screen. If you only have one monitor connected to the NUC, both menus will display on the single connected monitor. For a true test you may want to connect both displays.
Create a shortcut to displaymenu.bat and copy it to C:\Users\<username>\AppData\Roaming\Microsoft\Windows\Start Menu\Programs\Startup. This will ensure that the menus are started automatically with Windows and no user intervention is required to display the menus after the computer is started up.

[step 12] Create a scheduled task to run the bat file. Here’s the issue with HDMI. When the monitors are powered off, the menus will be all pushed to a single display because of HDMI hot-plug/auto-detect in Windows 7. This is default behavior for HDMI connected displays in Windows. Unfortunately, when monitors are powered back on and Windows re-detects them, the menus previously displayed on each monitor are not extended back to all connected displays. So without a scheduled task, if a monitor goes out and comes back on, the menus that were pushed to monitor1 will not extend back to monitor2.
You can avoid all this foolishness with scheduled tasks by spending $40 dollars for two monitordetectkiller devices. I’ve covered how those devices work here. If you don’t have these devices or don’t want to purchase them, proceed with the instructions below:
The tool MultiMonitor can be used to automatically re-initialize all displays that were previously turned off/disconnected. It automatically detects how many displays are connected and powered on extends the display area to use all HDMI displays. I run this batch file every 30 minutes, so that when the restaurant staff comes in and powers on the digital displays that were turned off overnight, the Intel NUC has time to run the script and reset all the menus properly before customers enter the restaurant.
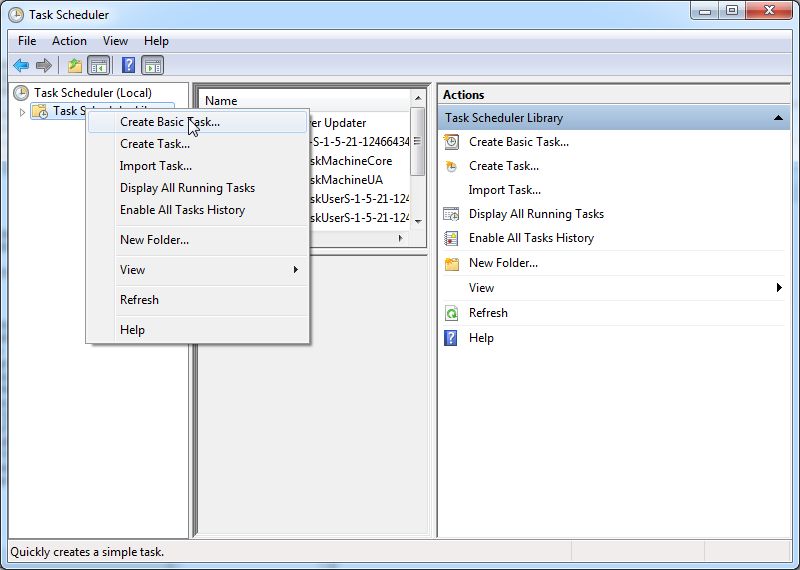
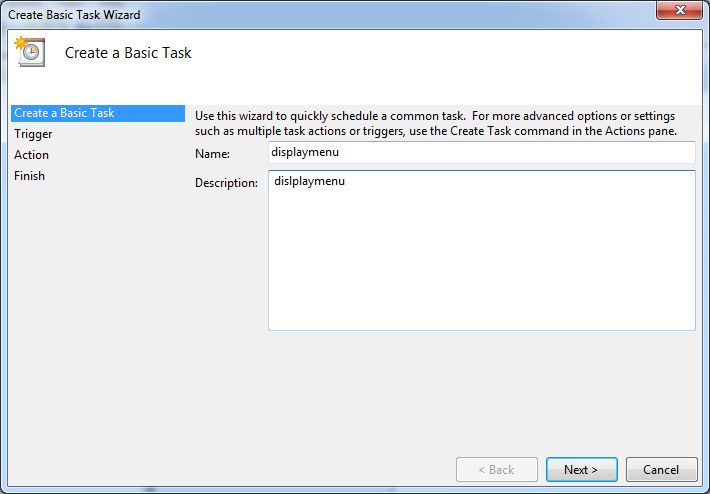
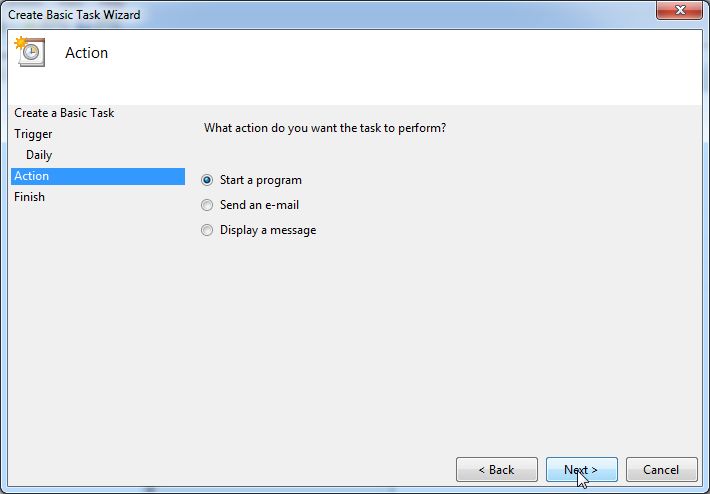
Click and type “task scheduler” into the search box. Then click the icon for Task Scheduler. Right-click the task scheduler library and select Create Basic Task… Then follow the wizard selecting the options shown in the screenshots below.

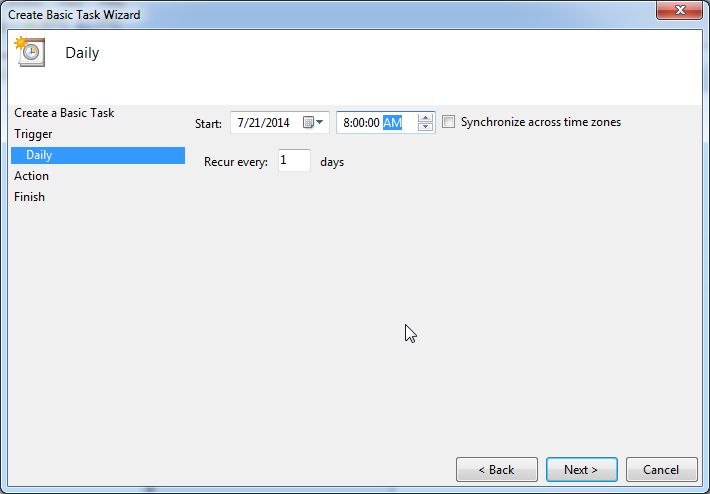
- Run task Daily
- Start at 8:00am and recur daily.
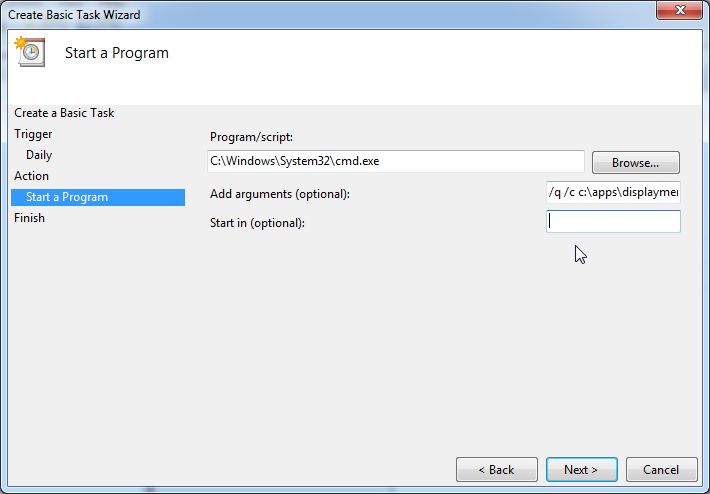
- Start a program
- Browse to C:\Windows\System32 and select cmd.exe and paste /q /c c:\apps\displaymenu.bat into the Add arguments (optional) field.
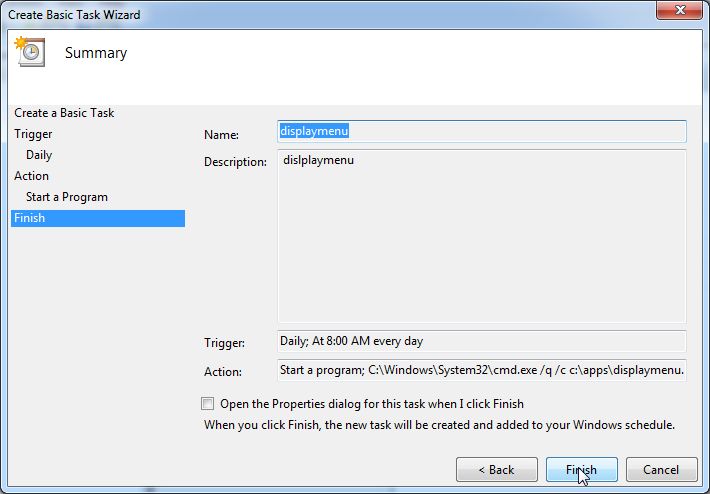
- Click Finish.
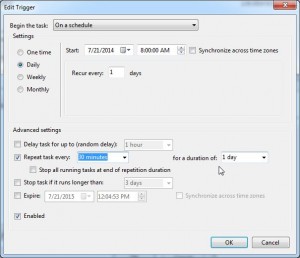
- Double-click the newly create scheduled task to edit it. Click the Triggers tab, double-click Daily trigger and specify that the task should repeat every 30 minutes.
Run the task to ensure it works as expected.
[step 13] Adjust a few Windows settings so the Intel NUC doesn’t reboot unexpectedly and auto-boots to menus after a power-out:
- Disable all balloon notifications – http://www.howtogeek.com/howto/windows-vista/disable-all-notification-balloons-in-windows-vista/
- Automatically log Windows in as the default user and do not prompt users for a password – http://www.howtogeek.com/howto/windows-vista/make-windows-vista-log-on-automatically/
- You can turn the option off to automatcially install updates and reboot, but i don’t recommend it – http://windows.microsoft.com/en-us/windows/turn-automatic-updating-on-off#turn-automatic-updating-on-off=windows-7
- Set the Intel NUC to automatically power on after power is lost/restored – You must enter the Intel NUC BIOS settings to do this by pressing F2 at boot then navigating to Power->After Power Failure and selecting the Power On setting, then pressing F10 to save.
- Install TeamViewer or the remote control program of your choice to remotely control the digital signage PC.
That’s it.