My home theater has been built around a home-made DVR since 2003. It started off on a used Dell Optiplex GX150 and moved to a bigger case with more hard drives and a P4 in 2006. It worked great for nearly 3 years, but in December I earned some extra cash and upgraded my DVR to a lean mean HD recording machine. Now my HTPC is finally up to par with the LCD TV in my living room. Now it plays my favorite shows in 5.1 surround, free of commercials, and in all their high def glory. Here’s the step by step guide covering my upgrade:
Equipment & Cost:
- A TimeWarner (or comparable) basic cable connection that rebroadcasts QAM HD content. (varies: $29/mo. – free)
- SiliconDust HDHomeRun® Dual ATSC/QAM Digital TV Tuner – (used eBay: $107)
- GIGABYTE GA-EP43-UD3L Intel Motherboard – (NewEgg: $79)
- Intel Core 2 Duo E7400 2.8GHz Processor – (NewEgg: $119)
- G.SKILL 4GB DDR2 1066 Memory – (new NewEgg: $79) – Not compatible: See Assembly & Installation
- MSI Radeon HD 4550 1GB HDCP Video Card (NewEgg: $39)
- XIGMATEK HDT-S1283 120mm CPU Cooler – (NewEgg: $36)
- LG SATA DVDRW LightScribe (Fry’s Electronics: $29)
- A few used SATA hard drives (500GB ea.) (PC recycling shop: $20)
- ATI Remote Wonder II RF Remote Control (eBay: $22)
- Logitech Wireless Keyboard/Mouse Combo (eBay $11)
- Hauppauge PVR150 PCI Video Capture card (eBay: $20)
Total: $482
Assembly & Installation
- Take the old hardware out of the case & sell it on eBay…hey I got $50 bucks for mine.
- Install new hardware according to manufacturer instructions.
NOTE: My system was crashing with the G.SKILL RAM and after running Memtest86+ revealed several hundred errors, I exchanged the ram only to find that the replacement had the same problem (compatibility issue with my Gigabyte motherboard). Now I use some Kingston RAM from the PC recycling shop and it works great.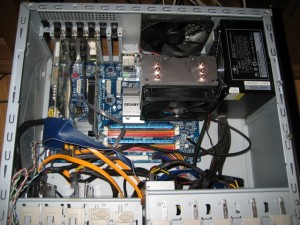
- Install Windows XP Professional. (Who doesn’t have a license lying around? Reuse it – It’s a great OS for HTPC use).
- Install the drivers for your hardware according to the manufacturer instructions but skip any bloatware (software that comes with the driver CD’s). Then install all the patches/service packs from windowsupdate.microsoft.com.
- Format your video storage hard disks (the ones you’ll use for storing recorded TV) using 64K Allocation Unit Size (don’t know how? check this article out: David’s Original DYI TiVo HOWTO).
- Download and install the following free applications in this order:
- Java JRE Runtime (needed for SageTV)
- HD HomeRun Software & Drivers
- Hauppauge PVR150 Drivers & Wintv (contains a free MPEG 2 Decoder)
- Microsoft Silverlight (for Netflix)
- Adobe Flash Player 10 (for Netflix)
- Adobe Reader 9 (for Manual)
- TweakUI (for AutoLogin)
- HULU Desktop (for watching HULU)
- ATI Remote Wonder Software & Drivers + RWKey Factory
- DirMON2
- ShowAnalyzer (trial)
- SageTV Media Center (trial)
- Comskip Playback Plug-in for SageTV (just save the zip file to My Documents)
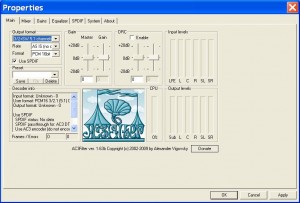
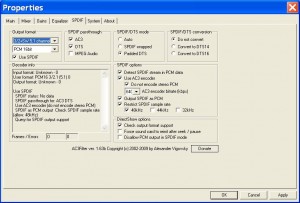
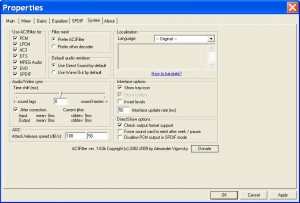
- AC3Filter (only install this if you plan on connecting your HTPC to a receiver capable of decoding DTS surround sound using S/PDIF over COAX or Optical)
Connect & Plug it in
- Get a standard 1 by 3 coax cable splitter to ensure that you have 3 Coax cable connections (This’ll allow you to record/watch 3 programs at the same time). Connect 1 to your Hauppauge PVR150 card and cables 2 & 3 to your HDHomeRun device.
- Plug your HDHomeRun device into your computer using an Ethernet Cable (a “crossover” ethernet may be needed for older motherboards). You should get a link light on both the HDHR device and your HTPC’s ethernet adapter.
- Connect HTPC’s graphics adapter to your Television using an HDMI or DVI cable.
- Plug in & connect your wireless mouse & keyboard so you can operate your PC from the couch.
- Plug in the ATI Remote Wonder II USB base station.
- If your HTPC has an S/PDIF out connection, connect it to your home theater receiver using an RCA (COAX) or optical cable. Ensure that you can hear sound over PCM using your home theater receiver before you proceed with installing AC3Filter. You might have to fiddle with your Sound Card settings and receivers inputs to get this to work.
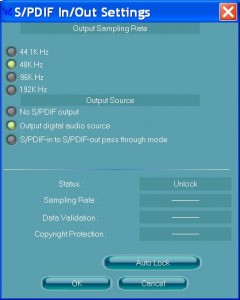
NOTE: If your HTPC doesn’t have S/PDIF out simply connect it using a banana plug to RCA cable for stereo only output.
Configuration
- Configure your screen resolution to 1920 x 1080. This is true HD resolution.
NOTE: You’ll probably have to increase the font size in Windows so you can still read smaller text. - Start the SiliconDust HDHomeRun setup wizard. Ensure that it detects both of your Digital TV Tuners.

- Enter a zip code for your physical Location.
- Select “SageTV” as your Main Application and “HDHomeRun QuickTV” as the “Preview Application” in the “Application” tab.
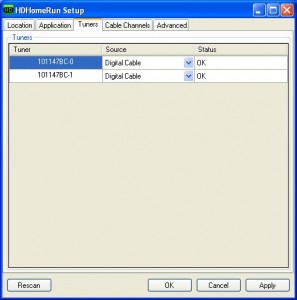
- Select “Digital Cable” as your source for both tuners on the “Tuners” tab.
- Perform a “Scan” in the “Cable Channels” tab.
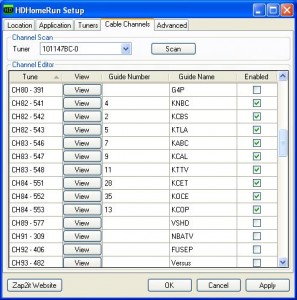
NOTE: Channels that have been determined to work at sufficient signal strength will be checked after your channel scan. Not all channels have check marks though because some will have either insufficient signal strength or nonQAM encryption that prevent them from working correctly.
NOTE: There will also be some duplicate channels (i.e. two KNBC’s etc.). Use the QuickTV viewer to see which one has better quality and then uncheck the one with the lower quality (keeping the one you liked checked). SageTV cannot display two of the same channels in the guide even if they are both checked in this wizard, so you’ll have to pick one of each of your duplicates and uncheck the other.
NOTE: SageTV also cannot display DT channels such as KNBCDT in the guide. If after a channel scan you prefer a DT channel such as KNBCDT, you can simply rename it to KNBC (without the DT) and uncheck any other KNBC selections in the list. In effect that channel will then be mapped to KNBC in the SageTV Guide. - When you’re all done, click “Apply” and “OK” to close out the setup wizard, but you can come back to it for more customization later. Just make sure you close SageTV before making changes in the HDHR Setup Wizard.
- Check to see if you have a small gray & blue icon in your task bar that says ATI Remote Wonder. If you do, chances are you’ll be able to use your remote to move the cursor on your screen.
NOTE: If for some reason you don’t see the icon and/or if you cannot move the cursor with your ATI Remote, you’ll have to open the task manager, end task a process called ATIRW.exe and restart the ATI Remote Wonder program from the All Programs menu. Once the icon appears in your taskbar, see my HOWTO article on configuring your ATI Remote Wonder II remote for SageTV. - While connected to the Internet, fire up SageTV Media Center and go through the initial configuration wizard in full screen mode.
- Make sure to set your overscan and aspect ratio options such that SageTV utilizes the whole screen (without borders).
- When you get to the screen where you’ll need to specify video recording directories, remote the default entry and specify the drive letters of the hard disks you formatted with 64K allocation unit size in installation step 5.
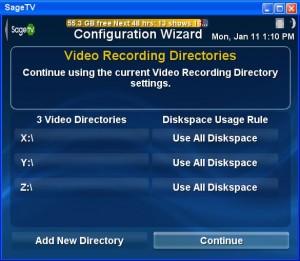
- When you get to the source section of the wizard you’ll have to add 3 capture devices. 1 Hauppauge WinTV Analog PVR150 Tuner and 2 Silicondust HDHomeRun Digital Tuners. Add the devices and specify your zip code & cable provider for each. It’ll ask you if you want to use the existing guide data it has downloaded…that’s fine. Once each Tuner is added, click each and select channel setup. Then do a channel scan to enable the available channels. For the Digital tuners it should only enable the channels you checked in the HDHR setup wizard.
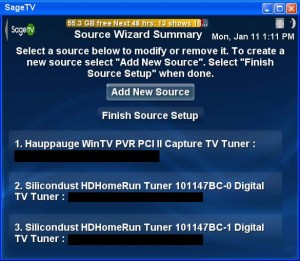
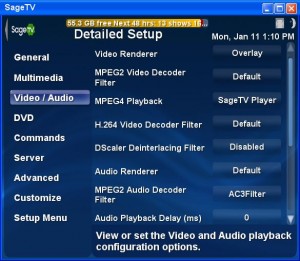
- Once you’re done with the initial setup wizard, click setup->detailed setup and ensure that you have the following Video/Audio settings set (unless you’re not using AC3 filter).
- Finally head over to Setup->Detailed Setup->Commands and using “Link Infrared/Keystroke to SageTV Command”, map your Remote control’s buttons to the SageTV commands such as Play, Pause, etc.
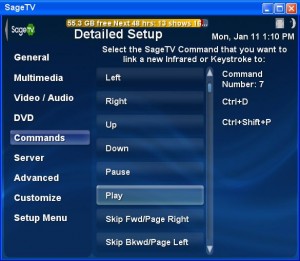
- Now for the commercial skipping part. Unzip the Comskip Playback Plug-in you downloaded to My Documents earlier to a folder. With that folder open and SageTV closed, open another file explorer window and navigate to C:Program FilesSageTVSageTV. Tile the 2 folder windows next to each other so you can easily copy things from the unzipped plug-in folder to the SageTV program folder. Move all files from the plug-in folder to matching directories of the SageTV program folder.
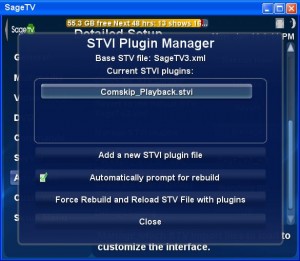
- Fire SageTV back up and click Setup->Detailed Setup->Advanced. Click Manage STVI Plugins and click “Add a new STVI plugin file”. Locate & select the Comskip_playback.stvi file you copied in the previous step and click Close. It’ll notify you that the file has been imported and SageTV has been reconfigured…that’s fine. Now SageTV is ready to skip commercials in video files that have an accompanying txt or edl file generated by ShowAnalyzer.
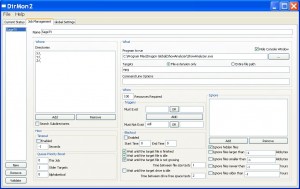
- Now that we’ve got the commercial skip plug-in installed in SageTV, we’ll have to configure the actual commercial detection. To do this, open DirMON2 GUI from All Programs. This utility will monitor a folder and launch ShowAnalyzer on each newly created mpg file until all mpg files in that directory have an accompanying commercial skip txt file generated by ShowAnalyzer. This txt file basically tells SageTV the start and stop times in the video file time line of detected commercial segments.
- Create a new job and call it SageTV.
- In the “Directories” section add the directories/drives that will contain your TV recordings.
- For “Programs to run” select the ShowAnalyzer.exe program file.
- For “Target extensions” enter mpg.
- For “Must not exist” enter txt.
- Optional: Check the appropriate boxes to wait until the file is finished recording if you have issues with commercial skip.
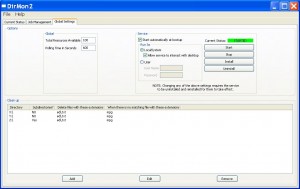
- Click the “Global Settings” tab. Add an entry for each directory that will contain TV recordings. This will clean up (delete) any txt files that have no matching mpg file (meaning you’ve watched and deleted a previously commercial skipped show or movie and the txt file is no longer needed).
- Save your settings and then click “Install” followed by “Start” to initiate the DirMON2 service.
NOTE: this will start commercial detection on all video files you have stored in the directories you are monitoring. If you have video files in those directories you’ll see a ShowAnalyzer progress bar pop up on your screen while this is going on. Read the next step to see how to hide this status bar and configure ShowAnalyzer properly.
- Open the ShowAnalyzer Configuration and configure the following options:
- Under Global Settings ensure that both selections that contain SageTV are set to “When done processing” for “When to create”. This will create both txt and edl commercial skip files in with matching file names in the same directory as the original mpg file.
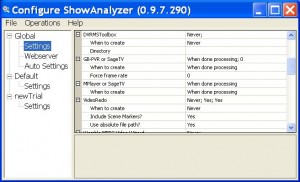
- To hide the interface when processing (so that you won’t see the annoying popup every time ShowAnalyzer processes a file) set the following options under Interface: Invisible Mode: “Yes”, Close when finished: “Yes”, everything else: “No”.
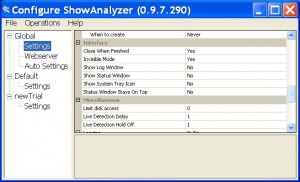
NOTE: Once you’ve done this it is difficult to determine if ShowAnalyzer is functioning properly, so you may want to wait on this step until you are sure everything is working properly.
NOTE: To see a queue of files that are in line to be processed by ShowAnalyzer, open up DirMON2 GUI and click on the “Current Status” tab. If nothing shows up in the queue and you have mpg files in the directory, try clicking “refresh” if that doesn’t work, stop and restart the DirMON2 GUI service and recheck the “Current Status”.
- Under Global Settings ensure that both selections that contain SageTV are set to “When done processing” for “When to create”. This will create both txt and edl commercial skip files in with matching file names in the same directory as the original mpg file.
- Now that you’ve configured all the commercial skip functionality, it’s a good time to stop and make sure things work. Record some TV (just pick any show from the guide) and record it or add it as a Favorite. Once the show is recorded and the mpg file exists on your video drive, fire up DirMON2 and see if it is processing the file in the “Current Status” queue. You might have to hit refresh a couple of times or wait for the timeout if it just finished recording. Once done processing, you should be able to see the commercial segments on the time line within SageTV when playing back the recorded TV show and a commercial segment is reached, it should automatically skip over the entire commercial and continue playing.
- Once playback, recording, and commercial skip is working properly it’s time to configure surround sound. There’s one caveat with surround sound though: Not all broadcast TV is in AC3 encoded 5.1 surround sound. So, if you’re watching a TV show in surround and a commercial segment starts your receiver will switch to stereo and the volume might increase quite a bit. It’s just something to be aware of.
- There now test playback with some show broadcast in HD (most have an AC3 surround soundtrack) and check to see that your receiver is switching to surround mode (DTS or whatever your receivers surround mode is). Sometimes you’ll hear a click on your receiver indicating that it is switching to a digital channel.
That’s it. Hope this makes someone as happy as it made me.
Comments
3 responses to “DIY HD DVR v2.0”
[…] recording of the television show you want to rip audio from. I record my shows using the Silicondust HDHR (HD HomeRun) digital tuner and SageTV and it outputs MPEG 2 […]
[…] recording of the television show you want to rip audio from. I record my shows using the Silicondust HDHR (HD HomeRun) digital tuner and SageTV and it outputs MPEG 2 […]
Questions from a user via email:
“May I ask what hardware you use at the TV’s in your house as the receivers? Are they wireless? And is SageTV your server?”
“Also, you imply that recording more than one stream can be difficult. I know that many of the DVR software packages talk about being able to use multiple tuners. Is it trouble to get them working more than one at a time?”
My answer:
“On my own DVR I two tuners:
Hauppauge PVR150 ($35 bucks on ebay)
SiliconDust HDHomeRun – Dual ATSC/QAM tuner ($100 on ebay)
The pvr150 is just a standard definition TV tuner that can record standard cable (you know the kind you get from basic cable but without a digital cable box). It can record any show on basic or extended basic cable, one show at a time in standard definition. This device is a PCI card inside my dvr.
The HDHR tuner is a digital TV tuner that can record only digital TV either broadcast over the air (ATSC) or rebroadcast over cable (clearQAM). It can record two programs at the same time because it has dual tuners, but it can only record digital channels such as 2.1, 4.1 or NBC-DT or CBS-DT. In essence, if you scan for channels on your HDTV and it receives over the air HD channels or HD channels over your cable connection, then the HDHR will be able to record them. This device is an external device that streams recorded content via ethernet to your HTPC.
SageTV has the capability to record TV shows from multiple tuners such as the two that I have mentioned above. My SageTV installation can record up to 3 programs at the same time (1 from PVR150 and 2 from HDHR).
As far as playing shows back, I have a WIFI N network that I use for that and it partially works. With WIFI N the problem is the “upto” in the up to 300mbps. I currently only get 150mbps on my N network and it is enough to stream standard definition TV to other sageTV clients in my house, but HDTV will start jittering after a while. If you can manage to get 300mbps on wifi with a good 5ghz router and your clients have good signal quality, then it’ll work, but this is difficult to achieve.
In my bedroom I am running SageTV off of an old laptop (sony FZ240EB with windows 7). It runs SageTV client and when you start it up it connects to the server for all my recorded content. The server is my main DVR in the living room which has SageTV Media Center on it (the one i described above).
Hope that answers all of your questions.”