Typically when you setup a new Office365 account, the setup wizard will guide you through steps that will eventually allow Outlook to autodiscover these settings. Here is how to connect Outlook to an Office365 account with out having an autodiscover DNS record setup:
[problem]
Manually connect Microsoft Outlook 2007 and higher to an Office365 account without using autodiscover DNS records.
[solution]
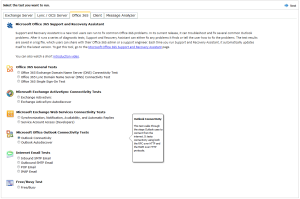
[step 1] Visit https://www.testexchangeconnectivity.com and click over to the Office365 tab, then click the radio button for Outlook Connectivity.
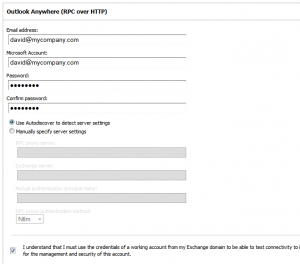
[step 2] Fill in a the fields with a valid office365 email address and account password. Be sure to check the Agree box and complete the captcha. Click Next to run the test.
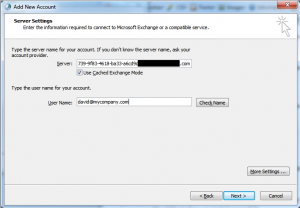
[step 3] Copy the server name/guid highlighted below to your clipboard.
[step 4] Open the Mail tool in the control panel and add a new profile. Select manually configure server types… then fill in the server name you noted down or copied to your clipboard in [step 3]. Enter the ofice365 account email address into the User Name field.
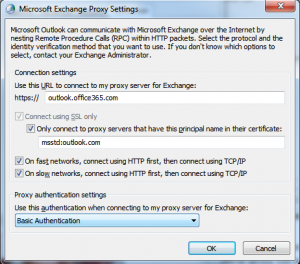
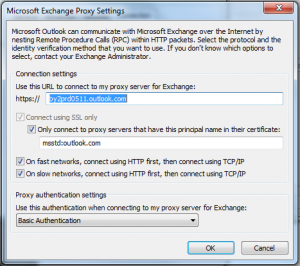
[step 5] Click More Settings… and then click the Connection Tab and check the box entitled Connect to Microsoft Exchange using HTTP and click the Exchange Proxy Settings… button. Enter outlook.office365.com into the https:// field, check both boxes below this field and enter msstd:outlook.com into the field that follows and select Basic Authentication.
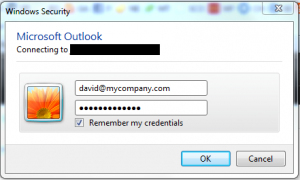
[step 6] Click OK twice and then click Check Name. You should be prompted for credentials. Enter the Office365 email address as the user name and the account password as the password, then click OK. Your account wizard should now complete the MAPI Profile.
These instructions are deprecated and no longer work:
[step 1] Sign in to the Office 365 portal (https://login.microsoftonline.com) with an account that has a license assigned and can open Outlook Web App.
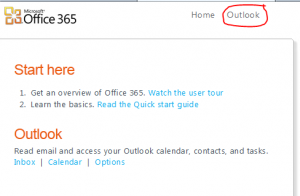
[step 2] Click Outlook to open Microsoft Outlook Web App.
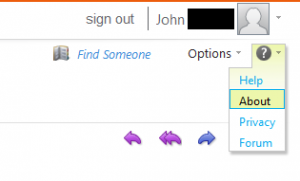
[step 3] In the upper-right corner of the page, click the Help icon (the question mark), and then click About.
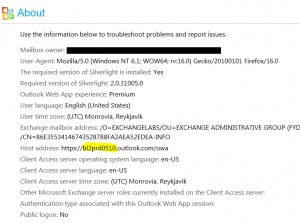
[step 4] On the About page, note the Host address Prefix (random characters highlighted in yellow). This prefix will be different for each Microsoft hosted account but the same for each user in that account.
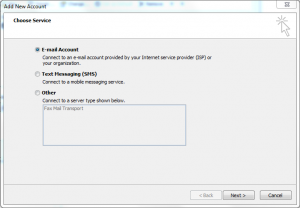
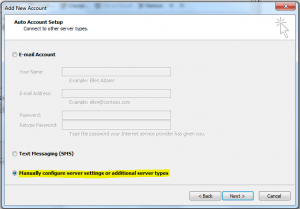
[step 5] Open Outlook and go through the add new account wizard and select Manually configure server settings when the option appears. Then click Next.
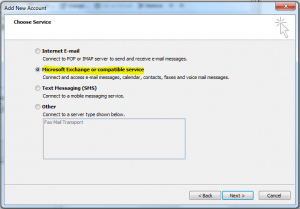
[step 6] Select Microsoft Exchange or compatible service and click Next.
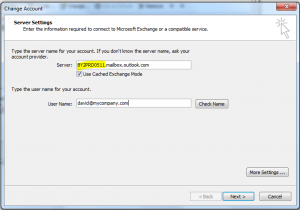
[step 7] Using the Host address Prefix you obtained in [step 4] above, you’ll want to create the server name by taking the Host address Prefix and appending .mailbox.outlook.com to it and then pasting that whole thing into the Server: field. Then put your email address into the User Name: field, but don’t click the Check Name button yet.
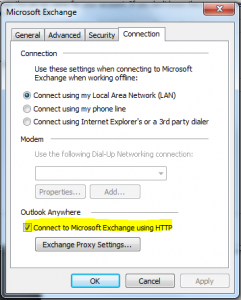
[step 8] Click the More Settings… button and then select the Connection tab. Now place a check mark into the box entitled: Connect to Microsoft Exchange using HTTP and then click the Exchange Proxy Settings… button.
[step 9] Using the Host address Prefix from [step 4] again, append .outlook.com to it and paste that whole string into the Use This URL to connect to my proxy server for Exchange field.
Check all boxes, and enter msstd:outlook.com into the Only connect to proxy servers that have this principal name in their certificate field.
Under Proxy authentication settings, select Basic Authentication and click OK.
[step 10] Click OK to the Microsoft Exchange More Settings dialog. Now click the Check Name button. You’ll be prompted to enter your email address and password to your email account. Once authenticated you should be able to finish adding the account.
[step 11] Click Next and Finish to complete the add-account wizard.
That’s it.

Comments
3 responses to “Manually connect Outlook to Office 365”
I have followed the instructions and I am getting the following error message:
The action cannot be completed. The connection to Microsoft Exchange is unavailable. Outlook must be on line or connected to complete this action.
I am on line, but Outlook is closed.
Hey Melinda,
Did Microsoft recently upgrade your Office365 account to Exchange 2013? You can tell by logging into Outlook Web Access at http://login.microsoftonline.com with your email address and password. With the Exchange 2013 upgrade everything will look blue and be themed blue. If Microsoft did in fact upgrade your account, I’ve seen situations where you have to re-create the entire account in Outlook.
I would try this. Close Outlook and click Start->Control Panel->Mail->Show Profiles. You’ll see your existing profile there. Select the “Prompt for Profile to be used” radio button and then click the Add… button to add a new profile. Enter your email address and password and let it auto-discover the Exchange settings for your email. Hopefully the wizard will be able to auto-add your account again.
If everything works, you can change the radio button to “Always use this profile” and select the new profile you’ve created. Then open Outlook and let it download all your stuff again. This is what happened to a few of my users after the Exchange 2013 upgrade.
Cheers,
David Vielmetter
[…] If all else fails, you can try to manually setup your systems MAPI connection. […]